If you love Minecraft, you know how frustrating it is when your weapon breaks in a fight or your tool falls apart in a mine. Fear not, for the solution lies in knowing how to make an anvil in Minecraft! This guide will show you how to make an anvil and why it is so useful in different situations.
What is an Anvil in Minecraft

- Definition and Function
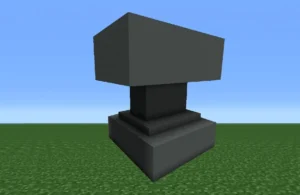
In Minecraft, an anvil is a vital utility block, serving as a crafting station to enhance and customize gear. Knowing how to make an anvil in Minecraft is crucial, enabling you to repair damaged items, rename equipment, and modify enchantments. If delving into enchantments, consider the anvil your trusty companion.
- Spawning Locations in Minecraft
Anvils naturally appear in woodland mansions, but crafting is a viable option, granting players control over gear enhancement. Whether discovered in a mansion or crafted in a cozy corner, the anvil’s utility is unparalleled.
- Crafting vs. Natural Spawning
The anvil’s beauty lies in versatility. While it naturally spawns, understanding how to make an anvil in Minecraft is straightforward. This flexibility ensures players, regardless of exploration preferences, can harness the anvil’s power—whether stumbled upon or meticulously crafted, it’s ready to perfect gear and face Minecraft’s challenges.
Items Required to Make an Anvil

A. Detailed List of Items Needed
Crafting an anvil in Minecraft requires a meticulous collection of resources. To embark on this crafting adventure, you’ll need the following items:
- 31 Iron Ingots: The backbone of the anvil recipe lies in the formidable iron. This crucial material forms the foundation for crafting an anvil.
- Crafting Table: The crafting table serves as the epicenter of your anvil creation. Ensure you have access to this crafting haven as you assemble the necessary components for your Minecraft anvil.
B. Iron Ingots and Blocks of Iron
Gather a total of 31 iron ingots for this crafting endeavor. Among these, allocate 27 iron ingots to form blocks of iron, providing the structural integrity that makes the anvil a robust utility block.
To obtain the required iron, follow these steps:
- Mine Iron Ore: Venture into the depths of Minecraft and mine iron ore using a pickaxe.
- Smelt Iron Ingots: Place the mined iron ore into a furnace to smelt it into iron ingots.
- Craft Iron Blocks: Arrange nine iron ingots in a crafting table to form a block of iron. Repeat this process until you have a total of three iron blocks.
C. Crafting Table Requirement
Ensure you have a crafting table accessible during your crafting process. If you don’t have one, craft it using wooden planks. This table will serve as the workspace where you assemble the carefully collected iron ingots and blocks into the formidable anvil.
With these items in hand and the crafting table at your disposal, including the crafting table crafted using wooden planks, you’re ready to forge this indispensable utility block and enhance your Minecraft experience.
Crafting an Anvil
A. Step-by-Step Crafting Process
Crafting an anvil in Minecraft is a sequential process that involves several key steps. Follow this step-by-step guide to understand how to make an anvil in Minecraft:
1. Collecting Iron Ore
Your journey begins with mining iron ore. Explore the depths of Minecraft, and with a trusty pickaxe in hand, mine iron ore blocks scattered throughout the underground terrain.
2. Smelting Raw Iron
Once you’ve amassed a sufficient amount of iron ore, head to a furnace and smelt the raw iron ore in the furnace to transform it into iron ingots. This crucial step is the foundation for creating the sturdy structure of your anvil.
3. Crafting Iron Blocks
Now, gather a total of 31 iron ingots. Take 27 of these ingots and arrange them on a crafting table in a 3×3 pattern to create three blocks of iron. These blocks will serve as the building blocks for your anvil.
4. Assembling the Anvil
With your three iron blocks and the remaining four iron ingots, it’s time to assemble the anvil. Place the three iron blocks in the top row of the crafting grid. Then, position a single iron ingot in the center cell of the second row. Complete the crafting process by filling the bottom row of the crafting table with iron ingots.
Voila! You’ve successfully navigated how to make an anvil in Minecraft. This versatile utility block is now ready to become an integral part of your gear enhancement and customization endeavors. Use it wisely to repair items, rename equipment, and modify enchantments as you navigate the challenges of the Minecraft world.
Uses of an Anvil in Minecraft
The anvil in Minecraft is a powerhouse of utility. Here’s a concise rundown of its impactful uses:
A. Repairing Items
Revive worn-out gear by placing it on the anvil with a corresponding material ingot or by combining two damaged items.
B. Renaming Items
Personalize items effortlessly by using the anvil to give them unique names, promoting organization in your inventory.
C. Modifying Enchantments
Modify enchantments without losing them by combining enchanted books with tools on the anvil, ensuring a strategic upgrade.
D. Crafting Enchanted Books
Create powerful enchanted books by combining them with tools on the anvil, enhancing your gear for the challenges ahead.
E. Weapon Use and Gravity Impact
Utilize the anvil’s gravity-bound nature as a weapon by strategically placing it to deal damage to entities below.
F. Maps Editor Functionality in Minecraft Bedrock Edition
In Minecraft Bedrock Edition, the anvil transforms into a map editing tool, allowing you to expand and edit maps creatively.
The anvil’s versatility elevates gear enhancement, repair, and customization, making it an essential component for an enhanced Minecraft experience.
How to Use an Anvil in Minecraft

Unlocking the potential of the anvil in Minecraft is key to enhancing your gameplay. Here’s a concise guide on its versatile uses:
A. Making Name Tags
Use the anvil to effortlessly rename items, adding a personal touch. It goes beyond labels—create Easter eggs, like the “Dinnerbone” effect, turning mobs upside down.
B. Repairing Items with the Anvil
Repair damaged tools seamlessly by placing them on the anvil with the corresponding material ingot or by combining two damaged items. Preserve enchantments, ensuring your gear remains potent.
C. Enchanting Items Through the Anvil
Combine enchanted books with tools on the anvil to strategically enhance gear. Customize your tools for specific tasks, making them more versatile.
D. Utilizing Falling Anvils as a Game Mechanic
Harness the power of gravity with anvils. Strategically place them to fall and deal damage to entities below, introducing a unique and unconventional weapon.
Understanding these anvil uses not only enhances your gameplay but also complements the knowledge of how to make an anvil in Minecraft. Master these applications for a creative and efficient Minecraft experience.
Read also: Retro Bowl Unblocked Games 76: Best Strategies to Win Every Game
Anvil vs. Grindstone (Quick Comparison)
| Feature | Anvil ✅ | Grindstone ❌ |
|---|---|---|
| Repair items | Yes | Yes |
| Keep enchantments | Yes | No |
| Rename items | Yes | No |
| Combine enchantments | Yes | No |
👉 Verdict: The Anvil is far superior for enchanted gear.
Frequently Asked Questions
Unlock the nuances of Minecraft anvils with these concise answers:
A. Comparison with Grindstone
Q: Anvil or grindstone?
A: Anvil is superior; it performs all grindstone actions without losing enchantments, making it the go-to for gear enhancement.
B. Lifespan of Minecraft Anvils
Q: How long do anvils last?
A: About 25 uses on average. Watch for durability, especially when using falling anvils.
C. Preventing “Too Expensive” Limitations
Q: How to avoid “too expensive”?
A: Switch to creative mode to extend limits beyond 40 levels, allowing continued use with the anvil.
Conclusion
In summary, the Minecraft anvil transforms gear management with its diverse functionalities, from renaming items to using falling anvils strategically. Its unique ability to preserve enchantments makes it a vital tool for players.
Additional Tips:
- Creative Use: Experiment with enchantments and repairs for personalized gear enhancement.
- Strategic Placement: Place falling anvils strategically for maximum damage to mobs.
- Monitor Durability: Keep an eye on anvil durability, crafting a new one when needed.
- Plan Enchantments: Understand and plan for enchantment costs, utilizing creative mode wisely.
An anvil can do many things for you in Minecraft. Follow these tips, and you will have a great time playing. No matter if you are new or experienced, you will always need an anvil by your side. Have fun making things! And don’t forget, if you want to make your tools better, learning how to make an anvil in Minecraft will open up new options for you.
Read more: Burrito Craft Game
